source http://titan.provider24.biz/ : variants > variant rules > gods of titan > creation guide
Gods of Titan - Creation Guide
- color ink printer, or better color laser printer
- white paper (80g/m²)
- gray board (1mm)
- double-sided self-adhesive foil
- a carpet knife, or better a cutter with snap-off blade
- metal cutting rulers
- A thick piece of cardboard to protect the table, or better a cutting mat
- irremovable single-sided self-adhesive foil to seal the counters, especially when you’re using an ink printer
- another ruler as fence for cutting more than one line of counters
- two screw clamps to fix the fence to the table
- Download all counter files.
- Print them on normal 80g/m² white paper. Thicker paper will tear apart at the corners after playing a couple of games. Make sure that all counters are sized 23x23mm each.
- Cut the double-sided self-adhesive foil in shape for the printed counter sheets.
- Stick the gray board and the double-sided self-adhesive foil together.
- Stick the paper on the gray board with the double-sided adhesive foil.
- Optional: Use a single-sided self-adhesive foil to seal the counters.
- Cut the sheets in lines of eight counters each. Make sure that you’re cutting in three or four strokes and the first one is cut gently.
- Ask a friend for help. Take four lines of counters and press it with the short side towards the fence.
- Cut the counters in sets of four pieces.
- Sharpen your blade or change it frequently.
- Make sure that you’ve good light conditions.
- Most of the gray board have got a rough side and a smooth side. Use the smooth side for the double-sided self-adhesive foil.
- When using single-sided self-adhesive foil to seal the counters, make sure that the surface of the counter sheets is free of dirt.
- color ink printer, or better color A3 laser printer
- white paper (80g/m²)
- gray board (3mm), minimum size 80x80 cm
- double-sided self-adhesive foil, minimum size 80x80 cm
- a carpet knife, or better a cutter with snap-off blade
- metal cutting rulers
- a thick cardboard to protect the table, or better a cutting mat
- a strong tape
- irremovable single-sided self-adhesive foil to make the Masterboard water proof, especially when you’re using an ink printer, minimum size 80x80 cm
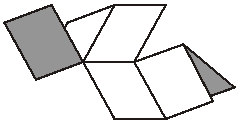
- First of all you've to decide how many times the Masterboard should be folded when it's stored.
- Not folded: size is 78x78 cm (of course the easiest way to make the Masterboard)
- Folded once: size is 78x39 cm (easy, but huge anyway)
- Folded three times: size is 39x39 cm (difficult, but handy size)

c) Folded three times
- Folded five times: size is 39x26 cm (tricky, but best size to store the Masterboard in a box)
d) Folded five times
- Download all Masterboard files.
- Print them on normal 80g/m² white paper. Thicker paper will tear apart at the corners after playing a couple of games.
- Cut any sheet into the same size of 26x39 cm (when using an A3-printer), or 26x19,5 cm (A4). Use the fine black crosshairs witch are printed onto the sheets to adjust the ruler.
When you make the Masterboard like a)...
- Stick the gray board and the double-sided self-adhesive foil together.
- Stick the paper on the gray board with the double-sided self-adhesive foil.
- Optional: Use a single-sided self-adhesive foil to seal the Masterboard.
- Cut off the edges of the Masterboard. Make sure that you’re cutting in a few strokes and the first one is cut gently.
- Stick the gray board and the double-sided self-adhesive foil together.
- Stick the paper on the gray board with the double-sided self-adhesive foil.
- Optional: Use a single-sided self-adhesive foil to seal the Masterboard.
- Cut off the side-edges of the Masterboard. Make sure that you’re cutting in a few strokes and the first one is cut gently.
- Cut the Masterboard into two pieces along the intersection of the printed Masterboard sheets.
- Fix the two pieces at the bottom side with a strong tape.
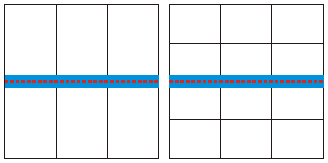
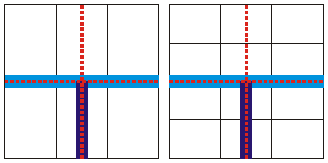
Systematic figure of the Masterboard when it's done like b). Left when using an A3-printer, right A4.
- Cut the gray board into four similar pieces (each 39x39 cm).
- Fix two pieces of the gray board with a strong tape together. This tape must be underneath the double-sided self-adhesive foil, the Masterboard sheets, and the optional single-sided self-adhesive foil. This bond will fold the surface of the Masterboard together.
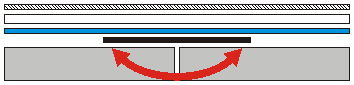
6. To fold the Masterboard towards the surface, the strong tape (black) must be fixed underneath the double-sided self-adhesive foil (blue), the sheets (white) and the single-sided self-adhesive foil (shaded). This bond is shown as a dark blue line at the systematic figure.
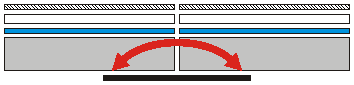
7. To fold the Masterboad outwards the strong tape must be fixed at the bottom of gray board (gray). The sheets and foils above it must be cut to fold it. This bond is shown as a light blue line at the systematic figure.
- Take the other two pieces of the gray board and fix them with a strong tape to the other two pieces. This time you must fix the tape at the bottom of the gray board!
- Now you have a board witch can be folded three times. Lay the board spreaded out onto the table and fix the double-sided self-adhesive foil onto it.
- Stick the paper on the gray board with the double-sided self-adhesive foil. Make sure that the edges of the sheets are placed correctly.
- Optional: Use a single-sided self-adhesive foil to seal the Masterboard.
- Cut off the side-edges of the Masterboard. Make sure that you’re cutting in a few strokes and the first one is cut gently.
- Cut the surface of the Masterboard at that edges where the strong tape is at the bottom of the board to make it foldable. But don't damage the strong tape!
Systematic figure of the Masterboard when it's done like c). Left when using an A3-printer, right A4.
- Cut the gray board into six similar pieces (each 39x26 cm).
- to be continued...
- Ask a friend for help. It's much easier to fix the self-adhesive foil without bubbles.
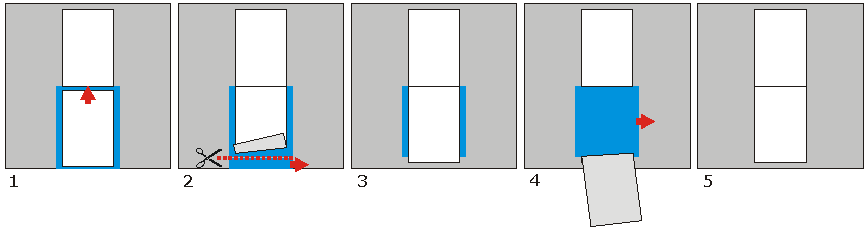
- To get the Masterboard sheets precisely together start with a sheet in the middle. Then use a piece of the protection foil of the self-adhesive foil which is bigger than the next sheet to fix. Cover the self-adhesive foil with it at the place where the next sheet has to be fixed. Now you can put the next sheet against the one already fixed exatly at it's edge and hold it in that position (1). Cut off a small strip of the protection foil on the opposite side of the edge and remove it (2). Fix the sheet at the small space of self-adhesive foil (3). Lift the sheet and remove the remaining protection foil (4). Fix the sheet carefully by unrolling it gently towards the other sheet (5).
- When you cut off the edges of the Masterboard hold the ruler always inwards. So when you slip with the cutter the Masterboard isn't damaged.
- Sharpen your blade or change it frequently.
- Make sure that you’ve good light conditions.
- Most of the gray board have got a rough side and a smooth side. Use the smooth side for the double-sided self-adhesive foil.
- When using single-sided self-adhesive foil to seal the counters, make sure that the surface of the Masterboard is free of dirt.
- a cardboard box
- 8 collecting boxes, with at least 20 compartments each